About Me

I am wife to my wonderful husband, mother to two adult children and Nana to one special granddaughter. I also share my heart and my home with several furbabies. Being creative doesn't come easily to me, but I love to try.
Bella Blinkie with Border
Powered by Blogger.
Showing posts with label Acrylic Paints. Show all posts

Thursday, January 15, 2015

~Stashing through the snow - Project #2 - Mixed Media Canvas

Over on the Cricut Circle message board, we were challenged by the lovely Sara to Dig it Out!  Dust it Off!  Put it to Use!  No buying unless it was for a specific project and we would use it right away.

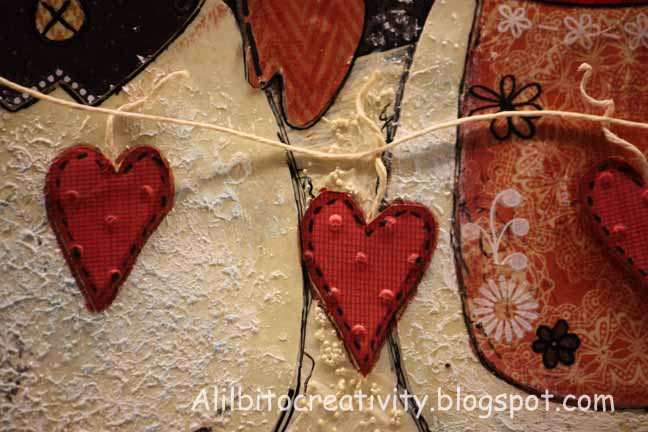
A little rummaging through my drawers produced these really cool Fancy Pants Glitter Cuts.  I'm not sure why I bought them (because they were shiny???), but decided they would look awesome on a mixed media canvas.  I started by decoupaging my canvas with some Soreh Designs tissue paper I found in my cart and I used Dylusion inks over that.  But I didn't like how deep the colors were, so I set that one aside and made a second one using Heidi Swapp color mists.  Much better!  I added my Glitter cuts and some rub-ons and doodling and MME enamel dots.  I made a little bow from feather yarn and attached at the top.  Finally I glued hangers on the back of the canvas and some pretty pink ribbon to hang my creation.  This stash busting is a very fun activity!  Can't wait to see what other little treasures I come across digging through my drawers.  I may have to start giving stuff away!  Thanks for stopping by!


Wednesday, October 30, 2013

~A little Spring in the Fall

So what do you do when the vibrant colors of fall are starting to depress you?  When everything around you is turning brown?  I'll tell ya what.  You do a SPRING project!  I actually started this canvas back in the early summer and then life got busy and then you know.  LOL  But I dug it back out to finish because my SAD is starting to kick in and I recently lost my beloved canine companion of 11 years and needed something bright and cheery to boost my mood.

I used Folk Art Festival for the birdhouse, Live Simply for the birds, flowers and bunny, and Library Font for the sentiment.  The tiny rolled roses were made using Elegant Edges (and taught to me by my friend Paulette!) with the leaves made from Heritage.

Add some TH distress inks, Folk Art Acrylics, some modeling paste, a stick, some floral wire and various rub-ons and you get a pretty little canvas like this to make you smile.  Thanks for stopping by!


And a few close ups.


Saturday, March 9, 2013

* snow day *

Last Wednesday, we received the only significant snow fall of the season.  It's hard to say how much since it was very heavy and wet, but I'm guessing around 10 inches.  Being March, I knew it wouldn't last long, so I pushed my daughter and husband out the door with my granddaughter and told them to "GO SLEDDING".  Safely perched above on the deck with camera in hand, I got some really good pics of the 30 or so runs down the hill on saucer.  Unknown to me, it had been "pre-greased".  LOL.  This was a tough layout for me because I normally don't do the bright colors, but Tacoah's winter clothes and her saucer screamed "NEON", so, it is what it is.  I comprised by using a solid burgurdy background over hot pink.  The strips of patterned cardstock framing the photo also provide a pop of color.  I used the Hello Kitty font at 3/4" for the negative OOPS in the photo frame.  A few splatters of white paint on the background help to provide that "snowy" feel.  Overall, I am pleased with how it turned out.  Thanks for stopping by!


Thursday, November 1, 2012

~ SnowPeople! ~

This is a re-do of a canvas I did a couple of weeks ago.  It was originally inspired by a magazine ad that I saw.  I wasn't too fond of the papers I used or the actual snowpeople, so when I finally starting perusing the Quilted Christmas cartridge and saw Mama and Pappa Snowpeople, I said Heck Yea!  This canvas is going to a dear friend who had us over for dinner a couple of weeks ago and absolutely adores decorating her house for all thing wintry/Christmasy.  I'm sure she'll love it.  Be sure to see the additional details below and thanks for stopping by!

All of the papers I used came from MMEs 6x6 paper packs with the exception of the SnowPapa's vest and hat.  That came from a Halloween pack as it was black with subtle little white circles/stars on it.  I found it perfect for my use. 

 The snow is made from Golden's Glass Bead Gel with some white and off-white acrylic paint mixed in.  I also used this gel on the moon and stars.  SnowMama has some glitter on her belt/hat and she also has a bow on her hat.


 The hearts were hand cut and run through my cuttlbug dots folder before being inked and colored and pen dot-lined.  A little string was added to create a heart garland and the sentiment added at the bottom.  I also created a little additional texture on my snowpeople using modeling paste with white paint added and then a really light blue pigment ink brushed on top.  Some pen doodling and rub-ons finished things up.

Friday, October 19, 2012

~Two Sweet Little Girls ~

I made these sweet little girls for a couple of BFFs who both have MS and who are a wonderful inspiration to me.  I hope they like them.  I learned how to do these canvases by taking Christy Tomlinson's SheArt Workshops.  If you haven't seen her work, you should stop by her blog.  Thanks for stopping by!


Wednesday, October 17, 2012

S'now place like home!

I saw an advertisement in a magazine that inspired this piece.   I love snowmen and hearts and this one has both!  There aren't any cricut cuts in this.  Everything was hand cut and/or hand painted.  I was really trying for a folk-artsy look, but I didn't have the right papers to pull off what I really envisioned.  I still like the way it came out, but will definitely being creating another one with the "right" paper.  Thanks for stopping by!


Sunday, October 14, 2012

Tacoah's Treasure Box!

A month or so ago I had picked up 3 of these chipboard boxes at Ms fairly cheaply.  Don't remember exactly how much, but they were on sale and I think I had a 25% off everything coupon as well.  Needless to say, the first box was a disaster, so I tossed the lid and keep some odds and ends in the box.  The second one became Paulette's gift for Circle Mania and the third one has been eyeballed by my granddaughter Tacoah for the past several weeks.  Since she's away right now, I thought it would be cool to decorate the box and have it waiting for her in her room as a surprise when she returns.

I picked some lovely little papers from the MME cowboy ministack to cover the box and for the letters and turtle. (who knew a cowboy pack would be good for little girls???)   The letters were cut at .75 on my E1 from Pooh Font.  The turtle was cut at 1.5 from Create a Critter.  I inked them all with Ranger Bundled Sage.   Once attached, the letters were also shaded with a Faber Castell india ink pitt pen Chromium Green Opaque.  The turtle was attached with an Action Wobble.  A few Sew easy doodle stamps and a little pink acrylic paint were added for visual interest.

Tacoah likes to collect little odds and ends and she really wanted the box to stash her stuff.  I hope she likes the way Nana decorated it for her.  Thanks for stopping box.


Monday, October 8, 2012

Scaredy Kat!

I'm just having so much fun working on these Halloween canvases.   There is no shortage of ideas when it comes to Halloween.  This one was inpired by one of the kitties on Happy Hauntings.  Some cheesecloth spider web and a little spider and some bling completes the scene.  Thanks for stopping buy!


Saturday, October 6, 2012

My Little Scarecrow

I did not feel like cleaning or doing laundry today, so I went into my craft room and pondered what to play with.  I have a big stack of various size canvases that I got on sale at Michael's a few weeks ago and they were sitting there staring at me, so I decided to make a little Halloween canvas for one of my g'friends.

I used my Cricut and cut two pumpkins from Autumn Celebrations for the project.  One at 1.5 inches and the other at 2 inches.  The layers were then painted in 2 different colors of acrylic orange paint and the stems/leaves were colored using Faber Castell india ink pens.  I also added some Glossy Accents to the pumpkins.  Mr. Scarecrow and his little buddy Crow were both handcut.  They were inspired by several non-paper projects that I found on the internet.  The crow was painted with a mixture of black paint and tar gel to give him some shine.

The canvas is 5 x 7 and I used several colors of acrylic paint in the background.  Orange, Lime Green, Perfect Purple and Turners Yellow over scraps of Fall MME pattern paper.   Rub ons and a little metal butterfly in the corner complete the project.  This was a fun way to spend a Saturday afternoon and I sure hope my g'friend likes this.  Thanks for stopping by!


Thursday, October 4, 2012

I survived Circle Mania!

Last weekend was a whirlwind of activity as I traveled to Atlanta, GA for the first ever Circle Mania.  Even though I was a bit under the weather, I enjoyed the socializing, the (little bit) of crafting, the Make n' takes, the food and the shopping.  Sure am glad to be home though!  The weather was really bad on Sunday and I think I was able to fly out by the skin of my teeth.  Later tornado alerts grounded all flights in and out.

Below is a pic of my calling card and a little gift (charm/stick pin) I made for each of the 50 Maniacs.  All of the attendees made a personal calling card and many had little gifts.  The cards were all so unique and different.  I don't think I got all 50, but I got most of them. They are pretty awesome and I'm still debating how I will store them.


Finally, I made this beautiful Autumn Altered Box for our wonderful hostess Scrapalette.  I tucked a few little scrappy surprises inside for her.  I hope she enjoys it as much as I enjoyed making it. 


Thanks for stopping by!

Sunday, September 23, 2012

Fingerpainting!

I've had this frame sitting around for a few months and finally decided on something to use it for.  My granddaughter loves Hello Kitty and I have a stamp with some words of wisdom that I wanted to pass along to her, so I came up with this project combining the two.   Most of this background was created by fingerpainting, although I did use a brush and pens for detailing the clouds, grass and flowers.  I cut the HK characters awhile ago, but I think they were cut at 3".  I also dabbed lavender/pink paint on the frame because the plain white was just too dull for me.  A few little buttons finished it off.  She is still trying to decide what "wall" she wants to hang this on.  Thanks for stopping by!