Showing posts with label Craft Room Basics. Show all posts
Showing posts with label Craft Room Basics. Show all posts
Thursday, January 15, 2015
~December Daily 2014
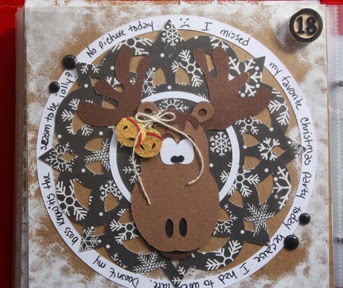
Still trying to catch up on posting my projects. With the holidays being so busy, the blog is often forgotten. Next up is my December Daily. I went overboard on supplies this year and I probably have enough stuff to make my DD for the next 3 years! sigh. But I had a TON of fun creating this. I warn you that this post is pic heavy. I actually only used cricut cuts on 4 or 5 pages this year, but my all time favorite is Day 18 and the moose from Go Canada! There isn't even a picture for that day. I challenged myself to use HAND JOURNALING this year. I challenged other crafty friends to do the same. I think it may mean something to our kids and grandkids some day to see our handwriting in these albums. Anyway, take a little stroll through my December and come visit again soon!
~Circle MB Calling Card Swap Album
Oh boy do I have a lot of catching up to do! I haven't posted since Thanksgiving!! EEK!
Well I will start with a little album I made to house all of the lovely 3 x 3 creations I received as part of a calling card swap on the Cricut Circle Message Board. I used the same basic techniques that were used when I made the album for the Cricut Mania calling cards that you can see in this post. The only difference is that I only used vertical waterfalls in this album and I spaced the pages a little wider and user fewer of them. I love the way it turned out! And those gals are just so dang talented!! Thanks for stopping by!
Well I will start with a little album I made to house all of the lovely 3 x 3 creations I received as part of a calling card swap on the Cricut Circle Message Board. I used the same basic techniques that were used when I made the album for the Cricut Mania calling cards that you can see in this post. The only difference is that I only used vertical waterfalls in this album and I spaced the pages a little wider and user fewer of them. I love the way it turned out! And those gals are just so dang talented!! Thanks for stopping by!
Sunday, October 13, 2013
~Pumpkin witch and purple hands
Let me start off by saying that Dylusions spray ink is neither water nor solvent soluable. ;-(
Tacoah and I set out to make a witches hat for the outdoor plastic light up Pumpkin that I got her at Walmart. The Cricut Design Team creates and makes available for free from time to time some pretty cool projects. I downloaded this one last week that creates a witches hat using images from Baby Shower (cone) and Cricut Craft Room Basics (stars, hat buckle).
I had recently bought some Colorbok glitter paper (really glittery) and thought this might be the perfect time to use it. There were other elements in the project (like a mask) that we really didn't need, so we just created the hat. I wanted to use purple ribbon around the brim but didn't have anything wide enough to cover the base of the wires holding the starts, so I decided to use white tulle and dye it with purple spray ink. This is where the purple hands come in. Let's just say I should have used gloves. But, it's slowly wearing off. Oh, and I burnt my middle finger on my hot glue gun too. ;-(
The finished project (and my purple hands after 3 washings). Thanks for stopping by!
Saturday, May 11, 2013
~NSD Challenge - CCR - Creating a split letter monogram
NSD Challenge #7 begins with a fabulous CCR tutorial by Narelle on how to create a split letter Monogram. These make wonderful anniversary or wedding or housewarming gifts and can be mounted in a glass frame or pretty much any solid surface. I chose a $1.99 bread board from Michael's. First I covered each side and the outer edges with a different pattern paper and applied modge podge. Once that was dry, I applied my vinyl monogram. Two more coats of modge podge went on top of that because I want to attach this to one of my porch posts. I threaded some raffia through the hold to hang it. I did not use CCR for this project. I used my Gypsy, so I had to do the last part of the tutorial by hand since my Gypsy just did not want to cut it correctly. Anyway, below is my finished project and I can alternate the side that shows. Thanks for stopping by!
Subscribe to:
Posts (Atom)


