Hey there friends! Here are a couple of relatively quick projects that Tacoah and I just finished for back to school. She picked all the images for her backpack (from the new CTMH Artistry) and decided the colors. I did mess up on the flower a bit because I tried to make a 2 layer cut into 3. Leaves have to be green, ya know? The extra name tag is for a bag that she will use to go to math class. In 3rd grade, it's the only class for which she needs to change teachers. Shelly picked this bag up at Gabriel brother's discount outlet for a couple of bucks. You would not believe that the original price of this thing was $89!! It's by an artist named Carlos Falchi who turns his paintings into handbags. I've never heard of him. Maybe you have. :-) Anyway, you know those plastic ties they use to put tags on items require a bulldozer to remove, so I just added Tacoah's nametag on top! And got in a bit of coloring too! I used Fontastic Fonts - DJ Smitten.
Thanks for stopping by today and I hope if you are readying for back to school you can incorporate some crafty time into it!
Saturday, August 15, 2015
Friday, August 14, 2015
~PopUp Challenge at thedailymarker.com
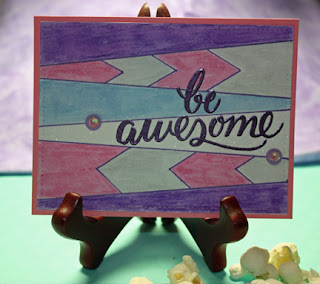
It's all about the lines. Over at the Daily Marker, Kathy is hosting a 4 day series of PopUp Challenges beginning today! This first challenge is all about the lines. Straight lines, curved lines, doodles lines. You get the idea. I used my zig watercolor markers to make this card. The colors I chose were based on the color of the embossing powder I used on the sentiment (purple). So I used Lilac, Sugared Almond Pink, Shadow Mauve & Cool Gray 1. I also used a clear Wink of Stella marker and threw a couple of sequins on there as well. I began by stamping & embossing my sentiment. I knew that I wanted alternating widths for my lines so I worked those around the sentiment. And then it just needed something else, so I added the arrows. Then it was just a matter of coloring the blocks. After that was completed, I went over my pencil lines with a purple pen. I mounted it to pink cardstock and threw some popcorn around it. That's for the extra goody bag part of the challenge. :-) Good thing I had some here!
Thanks for stopping by and you can check out tons of loveliness by searching instagram #TheDailyMarkerPopUpChallenge. There are some reallllyyyy talented doodling type people out there!
Thanks for stopping by and you can check out tons of loveliness by searching instagram #TheDailyMarkerPopUpChallenge. There are some reallllyyyy talented doodling type people out there!
Wednesday, August 12, 2015
~Summer Swap: Altered Book Box & Tags
Over on the Cricut Circle Message Board, we are just wrapping up a 2 month partner swap where our task was to create an altered book box and 5 tags using a summer theme of our partner's choice. My partner was Susan and she pretty much gave me free rein to make whatever I wanted. So I mixed a little of everything in. There's some beach and some sea and tons of different textures. I had a blast with this because I got to use paper and ink and paints and fabric and all kinds of little odds and ends as you'll see.
I actually created 6 double sided tags and put a ring through them all making a little tag album, plus I made 1 extra oddball to hold some extra charms I had that went with the theme. I also included some fabric flowers as a little extra gift.
And I was so excited to mail it that I forgot to take pictures of some of the items, so Susan gave me permission to use the ones she posted on the MB. Here's the stuff I created for her.
The front of the box had a sea floor made of blue stone with fish netting and shells and critters attached. there was also the requisite message in the bottle The sun was made from gold flecked tulle with an amber gem in the center.
The back was a little whimsical in that this die cut is from Fun in the Sun and fit perfectly on my background paper.
The spine was make with a brushed velvet type of fabric scrap and I scalloped the edges with a metal die. Palm trees from Summer Love were added on top.
The inside front cover came from G45 By the Sea and I added some jute ribbon around the edges. The inside of the book is my pink flamingo, also from Summer Lover, standing in the sand which was made from, what else? Sandpaper. 80 grit I believe. I had some fun here with some paint & clear tar gel and wink of stella. I added a few shells here as well.
The tags were ALOT of fun to make, but I'm glad I was only required to do 5. I actually did 6, and I made them two sides because I just had so much cool stuff I wanted to use!
Here are the fronts before they were bound.
And here are the backs.
Here they are assembled with the ring & ribbons and the little charm I made to attach. All of the following pics courtesy of Susan.
And finally the front and back of the extra tag I made to hold the extra charms I did not use on the project. I'm sure Susan can find a use for them. I used chalkboard paint on one side. That stuff is AWESOME!
And a little Timmy Distress Ink on the back.
Thanks so much for stopping by!
Tuesday, August 11, 2015
~Pop Up Challenge at theDailyMarker.com!
Head on over to Kathy's blog for all the juicy details! And you might win!
And there is coloring coming again in October! woohoo!
Pop Up Challenge
And there is coloring coming again in October! woohoo!
Pop Up Challenge
Friday, August 7, 2015
~I purred once.....
it was awful.
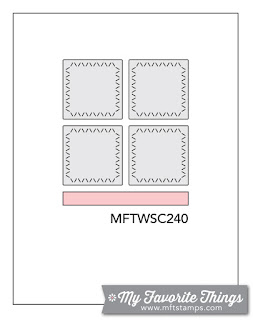
Yup that's what my little kitty says. lol. This weeks MFT challenge (sketch #240) was perfect to use with one of my new Taylored Expressions stamps and my awesome die-namics stax dies! It also gave me another excuse to use my Zig markers. And it makes me giggle every time I look at it.
Yup that's what my little kitty says. lol. This weeks MFT challenge (sketch #240) was perfect to use with one of my new Taylored Expressions stamps and my awesome die-namics stax dies! It also gave me another excuse to use my Zig markers. And it makes me giggle every time I look at it.
Here's the sketch:
And here's my take on it.
Thanks for stopping by!
~Picture Day
Well now it's been a little while since I created a layout. May I think, when Tacoah had First Communion.
I've actually had most of the papers I wanted to use on this picture sitting on my desk for a few months. {{blush}} I just needed a sketch and since I haven't used Family Album yet, that became my source. I used Image #15 (Back to School) and resized the focal block to fit Tacoah's school picture. The Picture Day phrase came from When I Was a Kid and was cut at 1.5" and the school books from Autumn Celebrations at 2.25" . Grade TWO was welded and cut from Paper Lace at 1 inch.
The border at the bottom was printed on chalkboard paper with a chalkboard marker using a system font called Return to Sender. The tags were in my stash and the ribbons on them coordinated with the paper I used. All of the paper was from my stash. Makes me smile. Thanks for stopping by!
Sunday, August 2, 2015
~So happy.
Last month's coloring challenge left me with lots of raw materials for some happy cards. And when I saw this week's sketch (#239) over on the MFT (My Favorite Things) blog, I knew I had to transform one using some of my awesome die-namics dies!
Here's the sketch:
And here's my card. This is a House Mouse Designs stamp that is just perfect for a summer card. Isn't he just adorable? hehe. And I wish I were laying right there beside him. I used my cross stitch die-namic circle die and then added a little sunshine. This sketch is just so versatile I will be saving it for some future cards as well. So glad I got a chance to play along. Thanks for stopping by!
Subscribe to:
Comments (Atom)


