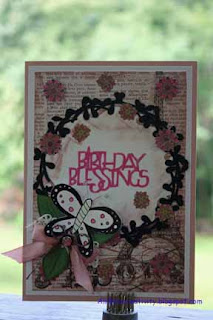
My mother in law is one of those rare people that still hand write letters and mails them. So, she genuinely appreciates a hand made card. It's also tough finding a gift for a 90 year old who has everything, so I made her a little Angel pin to go with her birthday blessings. This was the first time EVER that I have used my Cricut Pens too!
Recipe for the card below.
I started with a French patterned paper from MME Lost and Found and cut the center circle out from Paper Trimmings at 4.2 inches. I backed this piece with white cardstock. Next I cut the vines for around the center from Create a Critter at .875. The Birthday Blessings was "cut" onto the white cardstock backing using my Cricut Gel pens and George and Basic Shape at 1.5 inches. I hand colored the inside of the letters. I love the glittered look of this. The butterfly was hand made using a template from Simply Sweet @ 2.1 inches. I hand colored this and added wire antennae. He is foam dotted from the page. The little flowers placed here and there were fussy cut from a 6x6 MME pad called Indie Chic - Saffron. Some were pop dotted from the page. All had pink highlighting added by marker. The green leaves were hand cut and inked and I added seam binding colored with TH Distress ink and burlap twine. I topped this with a coordinating Recollections brad.
Inside, I embossed a piece of white cardstock with Cane Back Chair and hand made the little Angel pin and the pin holder. She is referenced in the birthday wishes I eventually put on the other side of the card.
This was one of my more labor intensive cards, but I really like the way it turned out. Thanks for stopping by!
Sunday, July 28, 2013
Sunday, July 21, 2013
~Congrats and Best Wishes
I don't know about you all, but I have a really tough time with masculine cards.
This is for a coworker who has retired from my company to move on to greener
pastures (not true retirement) and will be signed by everyone in his former
workgroup.
I made the card by welding two 5" images from Cricut Essentials and cutting it twice. The base paper wasn't double sided, so I adhered these two back to back to form the card base. I then cut 3 more at 4.5"; two in yellow (for the inside mats) and 1 in plaid (for the outside front). Finally I cut one more at 4" in the yellow for the outside front. All pieces were inked. The Congrats phrase was cut from Twinkles Toes and sized to fit the 4" mat using CCR (yes I've used it a couple of times). The inside phrase was cut from Cricut Alphabet (&) and Birthday Bash (Best Wishes). I used hide contour to hide the heart in the postage stamp. The finishing touch was a bit of twine tied around the fold of the card and I made a matching envelope from the same paper as the base of the card. Thanks for stopping by!
I made the card by welding two 5" images from Cricut Essentials and cutting it twice. The base paper wasn't double sided, so I adhered these two back to back to form the card base. I then cut 3 more at 4.5"; two in yellow (for the inside mats) and 1 in plaid (for the outside front). Finally I cut one more at 4" in the yellow for the outside front. All pieces were inked. The Congrats phrase was cut from Twinkles Toes and sized to fit the 4" mat using CCR (yes I've used it a couple of times). The inside phrase was cut from Cricut Alphabet (&) and Birthday Bash (Best Wishes). I used hide contour to hide the heart in the postage stamp. The finishing touch was a bit of twine tied around the fold of the card and I made a matching envelope from the same paper as the base of the card. Thanks for stopping by!
Thursday, July 18, 2013
~Feel Better Soon
One of my BFFs took a tumble a couple of weeks ago and I was so busy working on my kitchen at the time that I didn't have time to make a card until now. She loves all things nature, so I thought this card (inspired by one in an old issue of Paper Creations) would cheer her up as her bruises heal. The little bird was cut from Artiste at 1.5" in red polka dot, blue and yellow. I hand cut the blue overlay and the yellow wing from those pieces and layered and stitched over the red polka dot. The eye was hand drawn. I machine stitched the branch and also stitched on the leaves created from Sophie at .5". I inked the edges with dark green ink and crinkled them up a bit. I added some trim from my stash which I threaded a burlap thread (left over from a wreath I made) through and tied a bow. The papers came from 6x6 WRMK Anthologie & AC Celebrations. Thanks for stopping by!
~Welcome Wreath
Provocraft gave us a free Cricut Craft Room project this week for Welcoming students back to school. While I am not a teacher, I did download this project and modify it for our Vacation Bible School students. I removed the "to School" phrase from the original project and added "to VBS" using Hello Kitty font as 1.25". I'm sure the VBS teachers will enjoy this. This is the first wreath that I have made and I had no idea how much material it takes to wrap those foam forms! Egads! It was a fun project though, especially inking all those leaves (and there are bunches!). Thanks for stopping by!
Sunday, July 14, 2013
~A simple Thank You card
I spotted this card in an issue of Paper Creations magazine and the simplicity of it just jumped out at me. I think it was a Birthday card in the magazine, but I needed a Thank You card, so I adapted it. I cut the sun on white paper at 2.25" from Celebrate with Flourish. The circles were cut at 1". All the banners were hand cut from coordinating patterns and the card front was then stitched before being adhered to kraft cardstock. I had lots of fun coloring and hand doodling the sun and hope to incorporate more embellishments like this on my cards. Thanks for stopping by!
Subscribe to:
Comments (Atom)


