Last Birthday Card until November!!!
This is the last birthday card I need to make until November. My entire immediate family all have birthdays in January through July, except for one!
This one is for my mother-in-law who will turn 89 this week. She loves pink and she loves all flowers, so combining the two along with a couple of simple images from Elegant Edges and Create a Critter along with some pearls, this is what I came up with. I confess that it took me a week to do this card, primarily because version #1 got tossed in the trash when it was just about finished. I didn't like it. Version #2 turned out so much better.
The card base is 5.75w x 5.75h. Using the frame from Elegant Edges at 5.5w x 5.5h and a Scallop (also from EE) at 4.5w and 4.29h, I welded the Scallop inside the frame. Saving the circle cut from inside the scallop, I used that as a template for placing the pearls. The leaves were cut from Create a Critter at 1.9w x 3.0h. I stamped the birthday sentiment on off-white shimmer paper and cut to fit inside the pearls, then added the leaves and some Recollection flowers I had in my stash..
With the birthday cards out of the way for awhile, now I can focus on some other projects churning around in my head. Thanks for stopping by!
Wednesday, July 25, 2012
Sunday, July 22, 2012
Mixed Media - A new addiction???
After weeks of seeing some beautiful artwork by my Circle sister Barbara, I decided to try my hand at a mixed media project. I picked a simple tag, 3 1/4 x 5". I used plain creme cardstock. Ranger ink distress colors were stormy sky, crushed olive, victorian velvet and a little wild honey.
I first cut the birds from Celebrate with Flourish at 1.94 x 3. Save the negative mask. Temporarily adhere the bird on the tag wherever you want it.
Working with one color at a time, lightest to darkest, I rubbed the ink using a circular motion onto the cardstock in a random pattern using blending foam. Remove the birds and mist the tag with water. Set it with the heat tool. Put the bird back on the tag in the original position and stamp the tag with your choice of stamp(s)/ink colors. I used a Tim Holtz clock. Let dry. Remove the bird and place the negative mask over the spot and using a contrasting ink, stamp the negative space. Set an eyelet (I coated a gold colored one with alcohol ink) and fnish with ribbon or twine of your choice.
I printed the words on the same type of creme cardstock using Courier New font. I cut them out and inked with the wild honey ink and adhered to the cards.
This tag took me much less time than making a card and I've got tons of ideas in my head. I think I'm going to have to get some more stamps though!
After weeks of seeing some beautiful artwork by my Circle sister Barbara, I decided to try my hand at a mixed media project. I picked a simple tag, 3 1/4 x 5". I used plain creme cardstock. Ranger ink distress colors were stormy sky, crushed olive, victorian velvet and a little wild honey.
I first cut the birds from Celebrate with Flourish at 1.94 x 3. Save the negative mask. Temporarily adhere the bird on the tag wherever you want it.
Working with one color at a time, lightest to darkest, I rubbed the ink using a circular motion onto the cardstock in a random pattern using blending foam. Remove the birds and mist the tag with water. Set it with the heat tool. Put the bird back on the tag in the original position and stamp the tag with your choice of stamp(s)/ink colors. I used a Tim Holtz clock. Let dry. Remove the bird and place the negative mask over the spot and using a contrasting ink, stamp the negative space. Set an eyelet (I coated a gold colored one with alcohol ink) and fnish with ribbon or twine of your choice.
I printed the words on the same type of creme cardstock using Courier New font. I cut them out and inked with the wild honey ink and adhered to the cards.
This tag took me much less time than making a card and I've got tons of ideas in my head. I think I'm going to have to get some more stamps though!
Tuesday, July 17, 2012
Cricut Circle Blog Weekly Challenge
When I saw this week's Circle Blog challenge, I decided it was a good excuse to start building up my stash of cards to keep on hand. It always seems that when I really need a card for something, I'm really busy at work or with life, so it will be good to have this stash.
The challenge is to create a card using a sketch and at least 2 cricut cuts. I didn't really have a card type in mind, so I just started going through some of my handbooks and stumbled across and oldy but goody. Simply Charmed! I just loved these little strawberries, so a Thank You (or Thinking of You) card was born. I spruced up the cuts with some inking and a little acrylic paint, using paper from my stash. It was really quite simple to do (given the sketch) and hope to add to my collection in the near future. Enjoy!
When I saw this week's Circle Blog challenge, I decided it was a good excuse to start building up my stash of cards to keep on hand. It always seems that when I really need a card for something, I'm really busy at work or with life, so it will be good to have this stash.
The challenge is to create a card using a sketch and at least 2 cricut cuts. I didn't really have a card type in mind, so I just started going through some of my handbooks and stumbled across and oldy but goody. Simply Charmed! I just loved these little strawberries, so a Thank You (or Thinking of You) card was born. I spruced up the cuts with some inking and a little acrylic paint, using paper from my stash. It was really quite simple to do (given the sketch) and hope to add to my collection in the near future. Enjoy!
Birthdays in July
July is birthday month for two special people in my life. The first in my "surrogate" daughter. She is my daughter's BFF and is celebrating the big 30 this year, so I wanted to create a very special card for her. She loves all things nature, so I felt the butterflies would be a great choice. I used Kate's ABCs for the cuts for this card. I added some glossy accents to the base cut of the butterflies. The butterfly wings were run through my cuttlebug using the small dots folder. The sentiment at the top was stamped and some mint green jewels added. Hope you enjoy!
Next, I need to work on the card for my MIL who will be turning 89 this year, so stay tuned!
July is birthday month for two special people in my life. The first in my "surrogate" daughter. She is my daughter's BFF and is celebrating the big 30 this year, so I wanted to create a very special card for her. She loves all things nature, so I felt the butterflies would be a great choice. I used Kate's ABCs for the cuts for this card. I added some glossy accents to the base cut of the butterflies. The butterfly wings were run through my cuttlebug using the small dots folder. The sentiment at the top was stamped and some mint green jewels added. Hope you enjoy!
Next, I need to work on the card for my MIL who will be turning 89 this year, so stay tuned!
Sunday, July 8, 2012
Lazy Days of Summer
The last couple of weeks have been hectic around here, so I haven't had much time to be crafty. David and I took a 2 day trip to Gettysburg just for fun and had a great horseback ride of the battlefields.
Two days after we returned, the great derecho storm of 2012 hit our area and we were without power for a couple of days during one of the hottest stretches I can remember.
Once the power was restored, my daughter's BFF and boyfriend came to stay for a few days. It was good seeing her again and my granddaughter was thrilled to have someone new to tell her stories to.
I've got two birthdays to make cards for this month, so I need to find my mojo soon. One is for my mother-in-law who will be turning 89 at the end of the month. So stay tuned....they'll be coming soon!
The last couple of weeks have been hectic around here, so I haven't had much time to be crafty. David and I took a 2 day trip to Gettysburg just for fun and had a great horseback ride of the battlefields.
Two days after we returned, the great derecho storm of 2012 hit our area and we were without power for a couple of days during one of the hottest stretches I can remember.
Once the power was restored, my daughter's BFF and boyfriend came to stay for a few days. It was good seeing her again and my granddaughter was thrilled to have someone new to tell her stories to.
I've got two birthdays to make cards for this month, so I need to find my mojo soon. One is for my mother-in-law who will be turning 89 at the end of the month. So stay tuned....they'll be coming soon!
Sunday, June 24, 2012
Happy Anniversary!!
This week David and I celebrated our 33rd wedding anniversary. It's pretty awesome to know that you are married to your best friend, to know someone always has your back, and to understand that there is a special someone who is a witness to your life (haha, I got that from Shall We Dance, but it's a great quote and so apropos)! To mark the occasion, I created the following card for my beloved. He is not one for real mushy sentiments and is a very visual person, so I developed a card in contrasts to display how our relationship changes me. I hope you enjoy it.
The front of the card is basic black and white. I used images from Teen Scene and French Manor. The font is from Art Nouveau. A little black ribbon tied in a knot and a few black beads was all it needed.
The inside of the card is a blast of color and glitter. It's hard to tell in these pictures, but the cardstock behind the wording (as well as the background on the front) is a very textured off-white cardstock by Recollections. It's extremely fiberous and I think it would also work very well with torn edges. A little pocket on the inside top of the card contains a very personalized sentiment and is topped with a green ribbon knot. Green inking around all the edges finished the look for me. I'm not sure it turned out exactly the way I imagined, but he sure did like it. Thanks for taking a peek.
This week David and I celebrated our 33rd wedding anniversary. It's pretty awesome to know that you are married to your best friend, to know someone always has your back, and to understand that there is a special someone who is a witness to your life (haha, I got that from Shall We Dance, but it's a great quote and so apropos)! To mark the occasion, I created the following card for my beloved. He is not one for real mushy sentiments and is a very visual person, so I developed a card in contrasts to display how our relationship changes me. I hope you enjoy it.
The front of the card is basic black and white. I used images from Teen Scene and French Manor. The font is from Art Nouveau. A little black ribbon tied in a knot and a few black beads was all it needed.
The inside of the card is a blast of color and glitter. It's hard to tell in these pictures, but the cardstock behind the wording (as well as the background on the front) is a very textured off-white cardstock by Recollections. It's extremely fiberous and I think it would also work very well with torn edges. A little pocket on the inside top of the card contains a very personalized sentiment and is topped with a green ribbon knot. Green inking around all the edges finished the look for me. I'm not sure it turned out exactly the way I imagined, but he sure did like it. Thanks for taking a peek.
Monday, June 11, 2012
Being an only child, my granddaughter Tacoah doesn't often get to play with other kids and as a result has become a very imaginative child. While I was on vacation, my daughter asked me if she thought I could come up with some kind of puppet theater that we could use to interact with her and her imagination. Since she loves Spongebob and I got the cart last year, a project idea was born.
I started with an 18 x 24 inch tri-fold foamboard. Using spray adhesive, I covered this with felt.
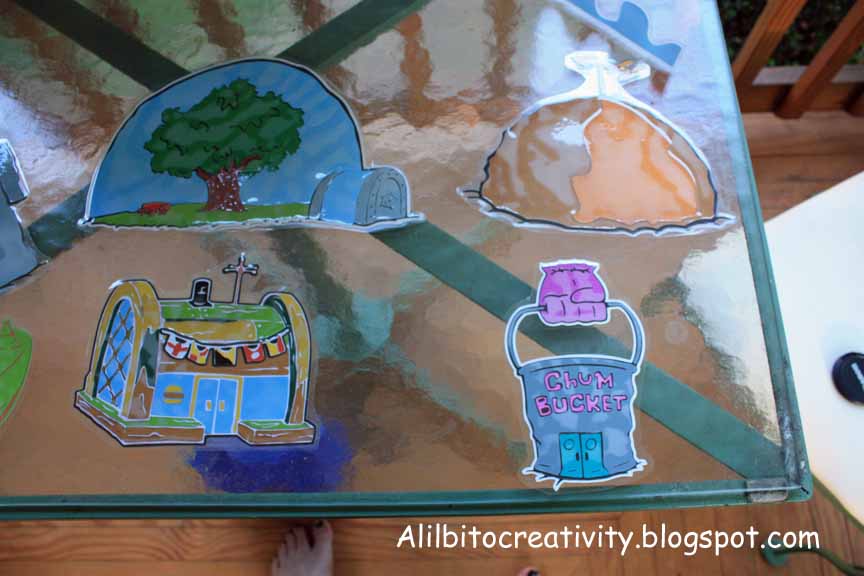
I then cut out the homes of the primary characters and a few extra props as seen above.
Finally I cut out the primary "puppets". Most of these were cut at 6". After assembling all the layers for everything, I laminated each for durability and then attached the characters to craft sticks to make the puppets. I put the hard loop piece of velcro on the back of all the props to enable her to interchange her scenes on the felt tri-fold. They stick surprisingly well. I picked up some flower foam at Michael's to store the puppets upright when not in use. These rest of the props go into an 8 x 10 envelop that can be stored inside the tri-fold when it is closed and tied shut.
So there you have it....one SpongeBob puppet theater. She's spent hours playing with it already, so it was well worth the time it took me to make it. Now to come up with something easier for the next project.....
I started with an 18 x 24 inch tri-fold foamboard. Using spray adhesive, I covered this with felt.
I then cut out the homes of the primary characters and a few extra props as seen above.
Finally I cut out the primary "puppets". Most of these were cut at 6". After assembling all the layers for everything, I laminated each for durability and then attached the characters to craft sticks to make the puppets. I put the hard loop piece of velcro on the back of all the props to enable her to interchange her scenes on the felt tri-fold. They stick surprisingly well. I picked up some flower foam at Michael's to store the puppets upright when not in use. These rest of the props go into an 8 x 10 envelop that can be stored inside the tri-fold when it is closed and tied shut.
So there you have it....one SpongeBob puppet theater. She's spent hours playing with it already, so it was well worth the time it took me to make it. Now to come up with something easier for the next project.....
Subscribe to:
Posts (Atom)