About Me

I am wife to my wonderful husband, mother to two adult children and Nana to one special granddaughter. I also share my heart and my home with several furbabies. Being creative doesn't come easily to me, but I love to try.
Bella Blinkie with Border
Powered by Blogger.

Saturday, January 11, 2014

~Beautiful

I've had this picture taped to my office wall for about 2 months.  I think it was taken when Tacoah was 4 or 5 years old.   It's such a gorgeous picture that I really felt I needed to think long and hard about the perfect layout to put it on.  Well you know how that goes.  lol.  It never gets scrapped.  So when Sara on the Cricut message boards posted another challenge today to kill some time while we await Provocraft's new reveal, I decided it was time.  There was a layout in the Nov/Dec issue of CKC magazine by Maggie Holmes that really caught my attention and I used that as my inspiration.  There is a little of everything on here including tissue paper, inks, twine, ribbon, burlap, buttons and tiny staples.  I still like staring at it. hehe.

I used Accent Essentials to cut the circles, Lacy Labels for the adore phrase and Artbooking for the kraft overlay.  Thanks for stopping by!


Saturday, January 4, 2014

~Daughter's Birthday

Time just keeps on trudging by even when you don't want it to.  Today my daughter Michelle turns 34.  Her birthday's are really starting to make me feel old.  ;-)  I did have her when I was quite young, but still.....

She said to me last night, "I guess you haven't started working on my card yet.".   eeekkkk!  So now they EXPECT a handmade card.  January is always a busy month for me at work and I just recently finished Christmas cards AND a December Daily.  I hadn't had time to catch my breath and consider what I would do for her birthday card.

So I got adventurous and pulled down a cart I've not used yet and CHEATED.  Haha!  Not really, but Creative Cards gives you basic card that you can bling up and really make your own without having to think about measurements and welding stuff together, etc. 

I loved this color combination of purples and soft greens.  I cut the card at 6".   I embossed flourishes on the butterflies and popped them from the page.  I added machine stitching and inks.  On the inside, I glittered another butterfly and used my cuttlebug on some vellum.  I really like the way this turned out and it really WAS minimal effort.  Michelle loved it too and that's what really counts!

Now who will make MY birthday card in two weeks??????
Thanks for stopping by!


Wednesday, January 1, 2014

~December Daily 2013

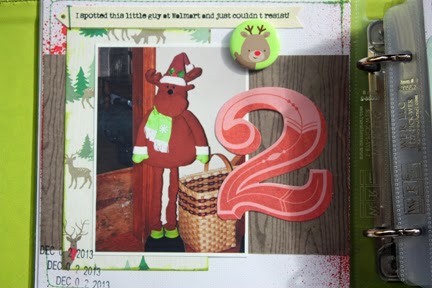
This is the first time I have attempted to do a December Daily and I am THRILLED with the way it turned out.  I used papers and embellishments from 25th & Pine, Simple Stories and MME.  I used Cricut cuts on a few of the pages with the most notable being the overlays from CTMH Artbooking.  Shown below in order is the cover, inside cover Intro, Days One through Thirty-One and a Year in Review Summary.  I will DEFINITELY do this again next year!  Let me know what you think.  I value every comment I receive.  Thanks for stopping by!


~2013 Christmas Cards

Although I got a late start this year, I did manage to mail out all the Christmas cards 10 days before Christmas.  I did a red and green version (20 of each) using the elves from Jolly Holiday.

Thanks for stopping by!

 
I made two of the 3 Birds on Parade Santa cards for my two BFFs.
 
..
 
I also always make a special card for my mother-in-law.  This year I used Inspired Heart. 


Finally, the cash holders I made for my kids using the Imagine cartridge The Good Old Days.


Saturday, November 30, 2013

~A Masculine Birthday Card

My older brother turned 60 on Thanksgiving Day!!  Woo Hoo!  Masculine cards are NOT my favorite, but this one came together pretty easily.  I got the idea to use a top hat because a) he wore one at his wedding, and b) I've always thought older gentlemen who wore top hats looked pretty dapper.  ;-)

The top hat came from Weddings and I cut it twice. It's hard to tell in the picture but the 2nd cut was using a kind of suede paper and I layered the top, brim and bow of the hat using that. The banner was also suede and I used the honeycomb border embossing folder on it. Over the Hill was used for the 60 on the inside. The brad on the front came from an MME Lost and Found set.  I think the combination of the gray card base and the white and silver cardstock combination give it an air of sophistication.

The sentiment inside is perfect from Mr. Schultz and added that necessary touch of whimsy.   My brother loved the card (along with the electronic toy we gave him as a gift).   Thanks for stopping by!

Friday, November 8, 2013

~Halloween Layout - Hey No Zombies!

Ok, so we managed to avoid the zombies this year, but it was a close call.  I just brought home a boo-tiful princess gown and all thoughts of blood and guts vanished!  I used the Recollections Haunted Manor stack, lots of stitching and some burlap. The title was cut from Storybook at 2.5".  Thanks for stopping by!


These pics were all about the pumpkins.  This one was plastic and lit up and was adorned with a glittery hat that Tacoah and I made.  But of course, she did carve one too.  The title was cut with Hello Kitty Font at 1" and 1.25".


Wednesday, October 30, 2013

~A little Spring in the Fall

So what do you do when the vibrant colors of fall are starting to depress you?  When everything around you is turning brown?  I'll tell ya what.  You do a SPRING project!  I actually started this canvas back in the early summer and then life got busy and then you know.  LOL  But I dug it back out to finish because my SAD is starting to kick in and I recently lost my beloved canine companion of 11 years and needed something bright and cheery to boost my mood.

I used Folk Art Festival for the birdhouse, Live Simply for the birds, flowers and bunny, and Library Font for the sentiment.  The tiny rolled roses were made using Elegant Edges (and taught to me by my friend Paulette!) with the leaves made from Heritage.

Add some TH distress inks, Folk Art Acrylics, some modeling paste, a stick, some floral wire and various rub-ons and you get a pretty little canvas like this to make you smile.  Thanks for stopping by!


And a few close ups.